Render and Post Processing Effects
Render Effects is an advance post-processing feature in Shutter Pro, which can be used in producing high quality images.
In the Output Menu, click on the Render Effects tab and the drop down menu will show the Render Effects and Post Processing features. It is possible to produce images in Spotlight without using Render Effects, although using Render Effects enhances and adds advanced effects on an image. Render Effects configurations can be transferred to other apps such as Shutter and Sphere, but won’t work on apps like Video and Gallery.
Retain Customisations
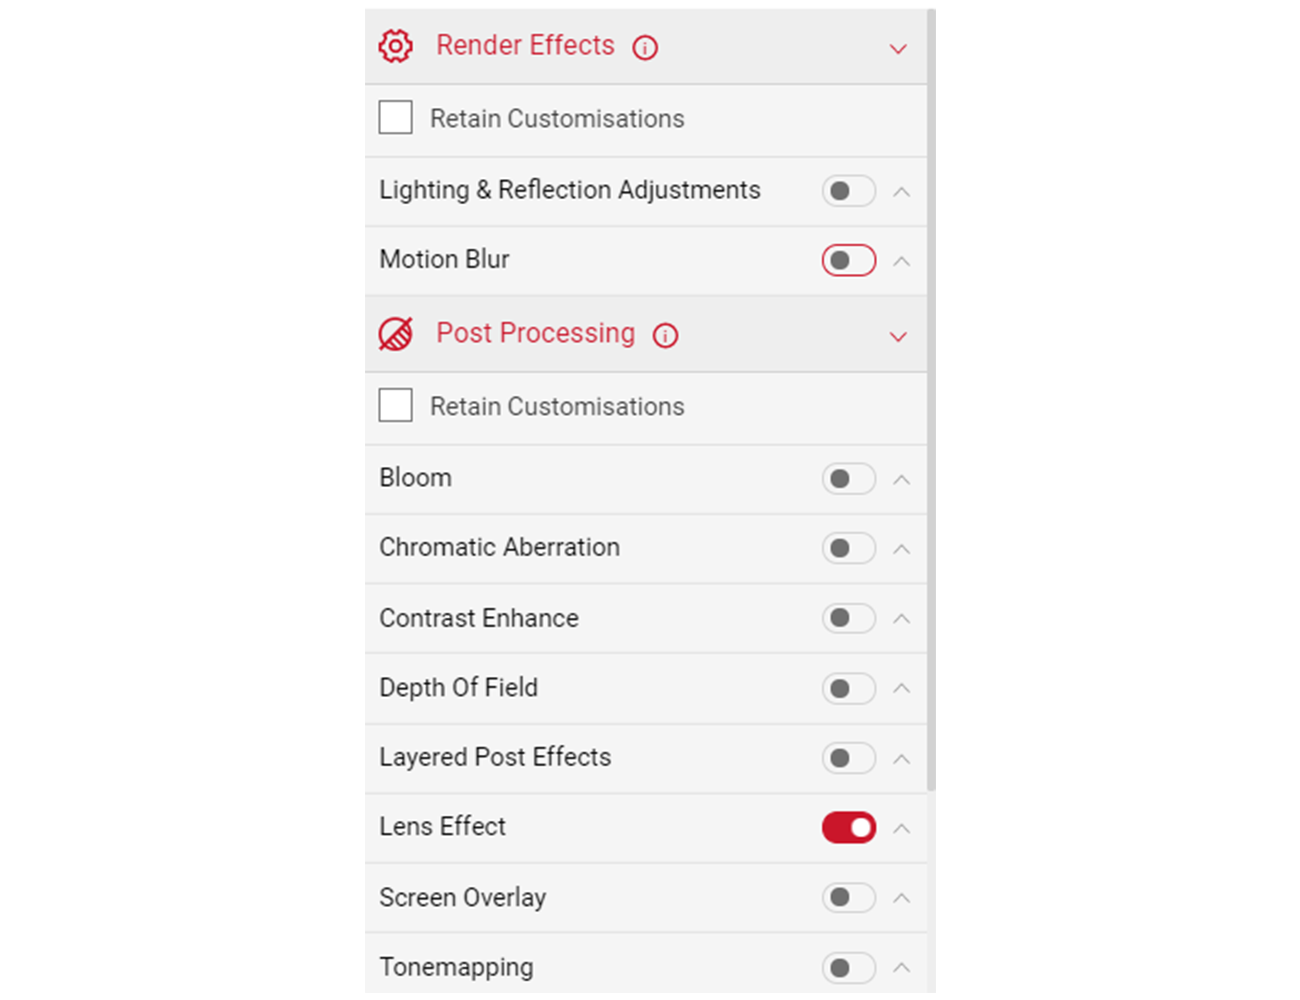
Located just under the Render Effects tab, tick this option to prevent from losing your individual Render Effects feature settings.
- Cameras and environments can have their own default render effects, if Retain Customisations is unselected, your settings may change when you select a new camera or environment.
- If selected, your Render Effects will save. Some cameras don't support some Render Effects, if this is the case the settings will deactivate.
- Flycam will always keep your Render Effects if Retain Customisations is selected or unselected.
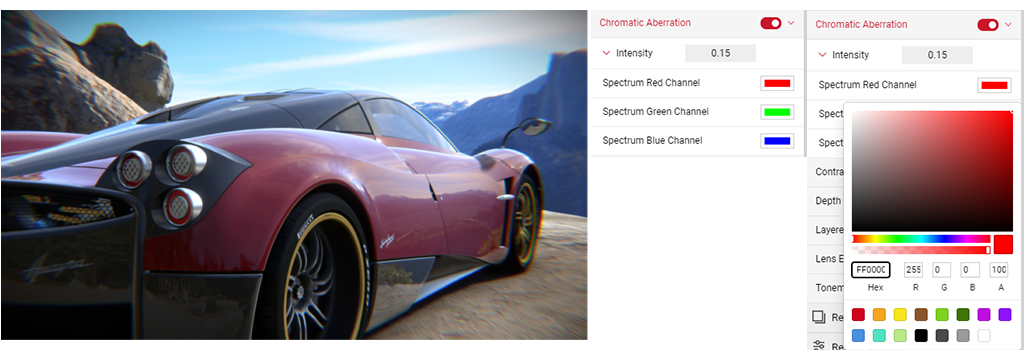
Chromatic Aberration
Enable the Chromatic Aberration effect to create a simulated lens distortion effect on the edges of the image. Click on the slider button on the right of the tab to enable the feature. The slider button turns red once the effect has been enabled.
- Click on the Intensity panel to reveal the slider to adjust the intensity of the distortion.
- You can then select each Spectrum Channel to adjust each colour.
- To disable the effect, click on the red slider button, which will switch to grey once deactivated.
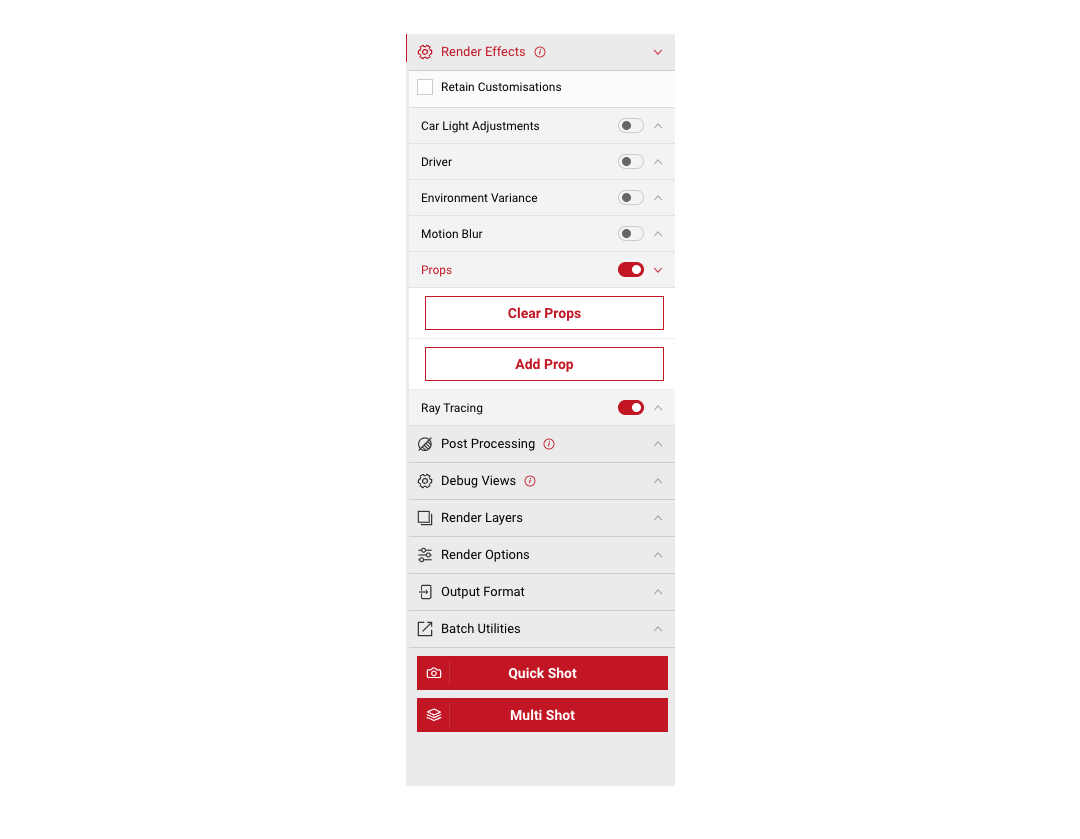
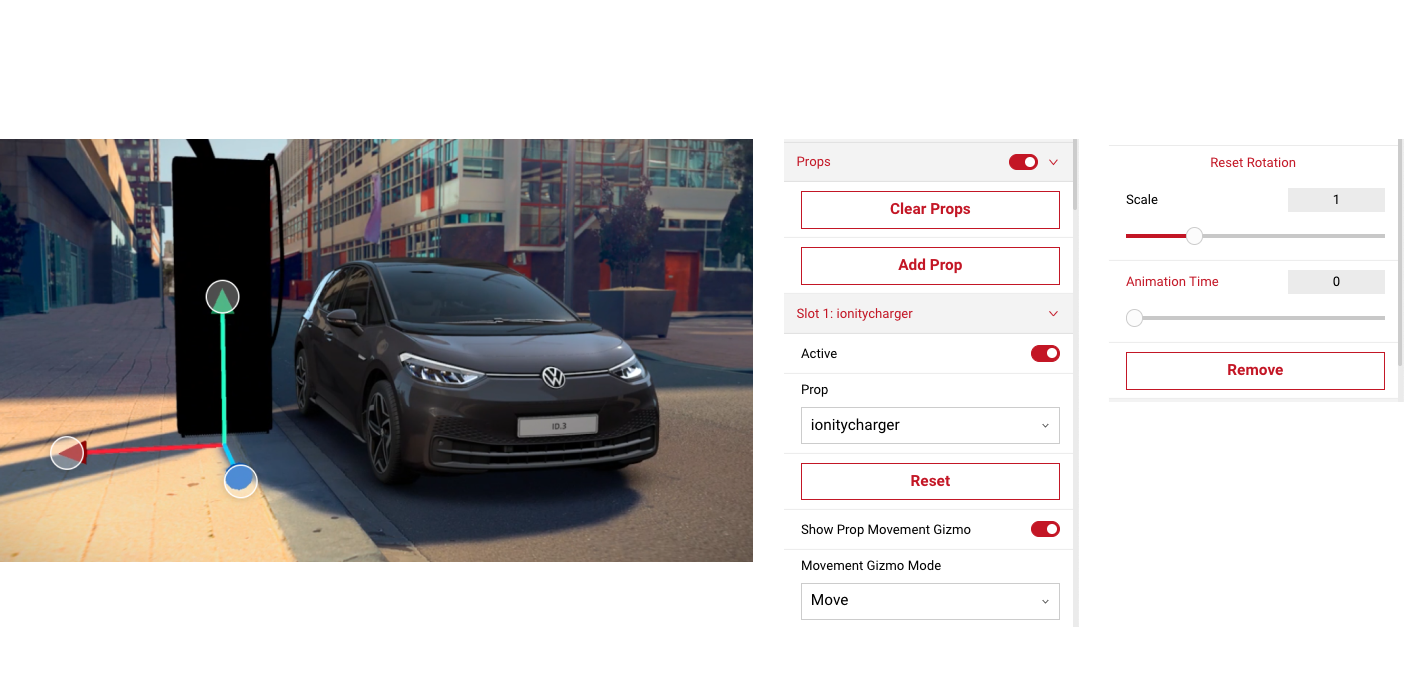
Props
Props allow you to add additional objects into the scene (up to 4). Once a prop is added additional controls will become available for each slot. Users can select an anchor point, which then sets the prop's position, rotation and scale to be relative to the selected anchor, or use the Prop Movement Gizmo to drag the prop into position across each axis.
Note: This feature is only available to services using the 21.4 viewer.
- Clear Props: Removes all existing props (whether active or inactive)
- Add Prop: Adds a new prop to the Props effect UI, allowing the user to edit it.
Adding a Prop
- Click Add Prop. This will create the prop slot.
- Under Prop 1, select the prop type from the dropdown switch the toggle to Active. In this example, we'll be adding the ionitycharger. You should see the prop become visible in the viewport after switching it to active.
- Use the movement/rotation gizmos to move the prop into the desired position.
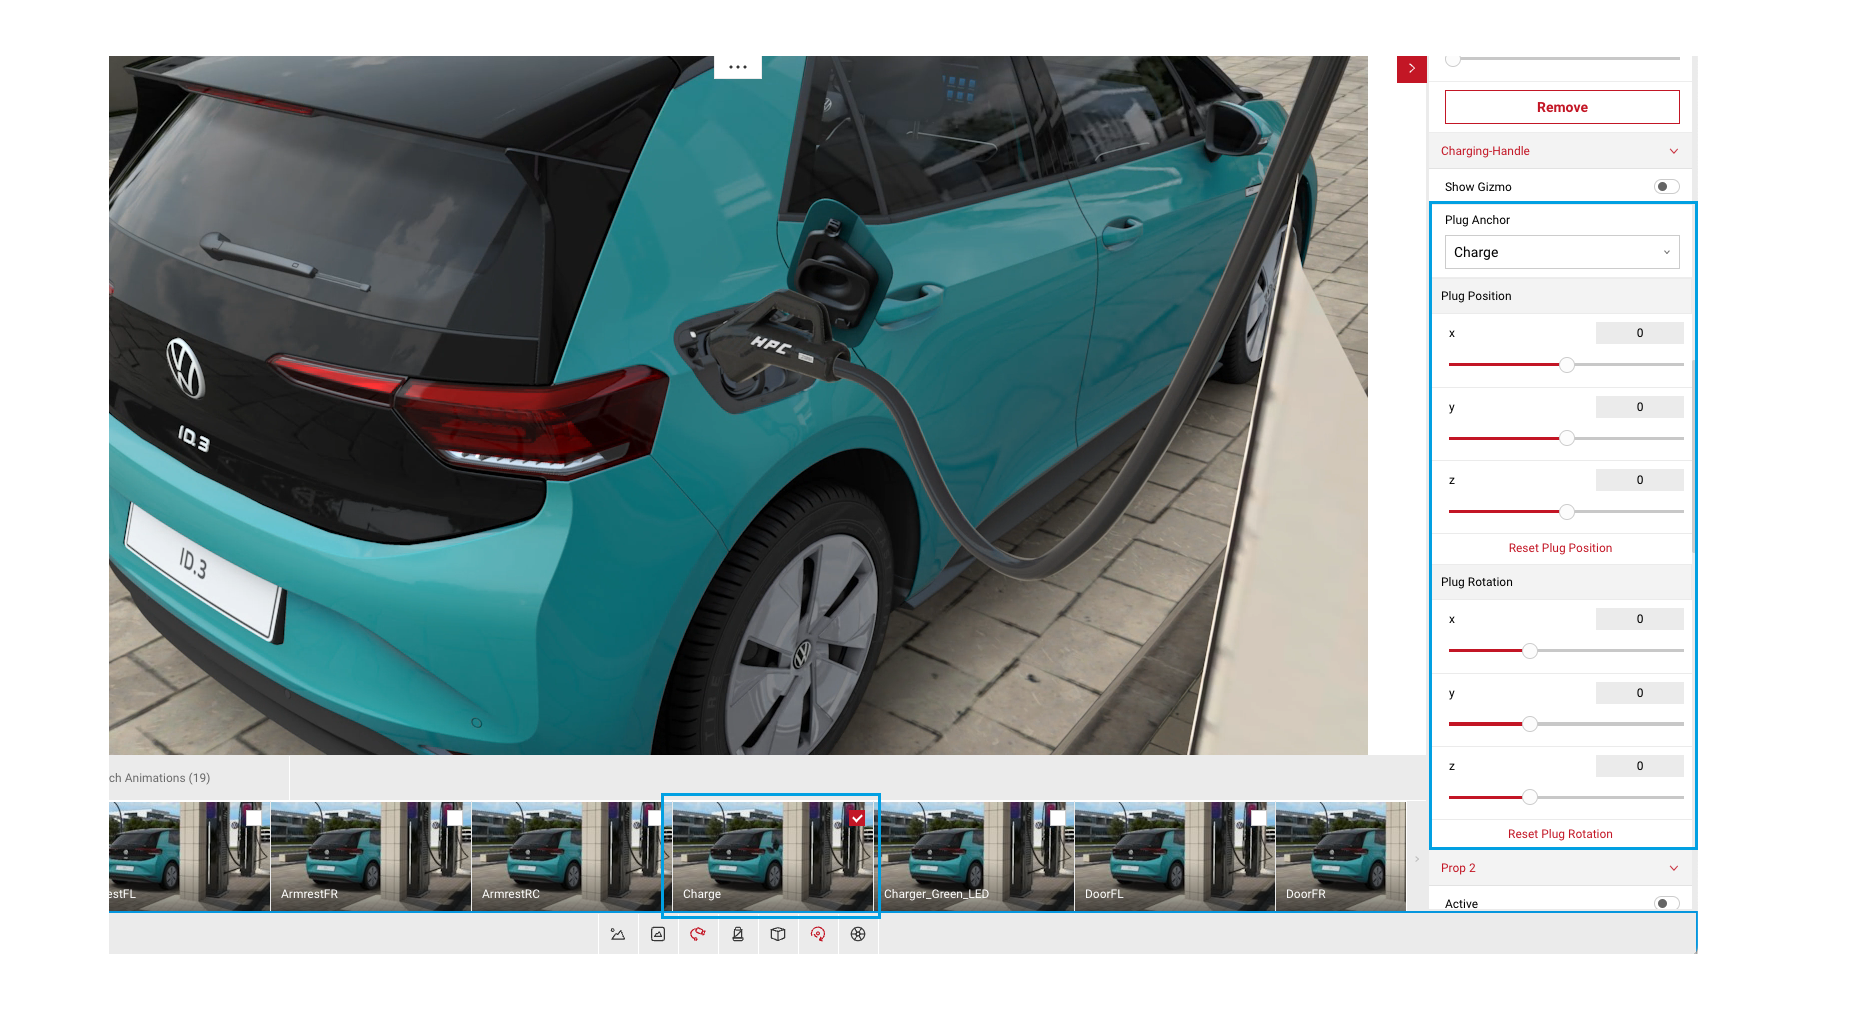
- To activate the charging handle for this prop, scroll down to the Plug Anchor dropdown and select Charge.
- This should automatically add the charging handle and rope to the port on the car.
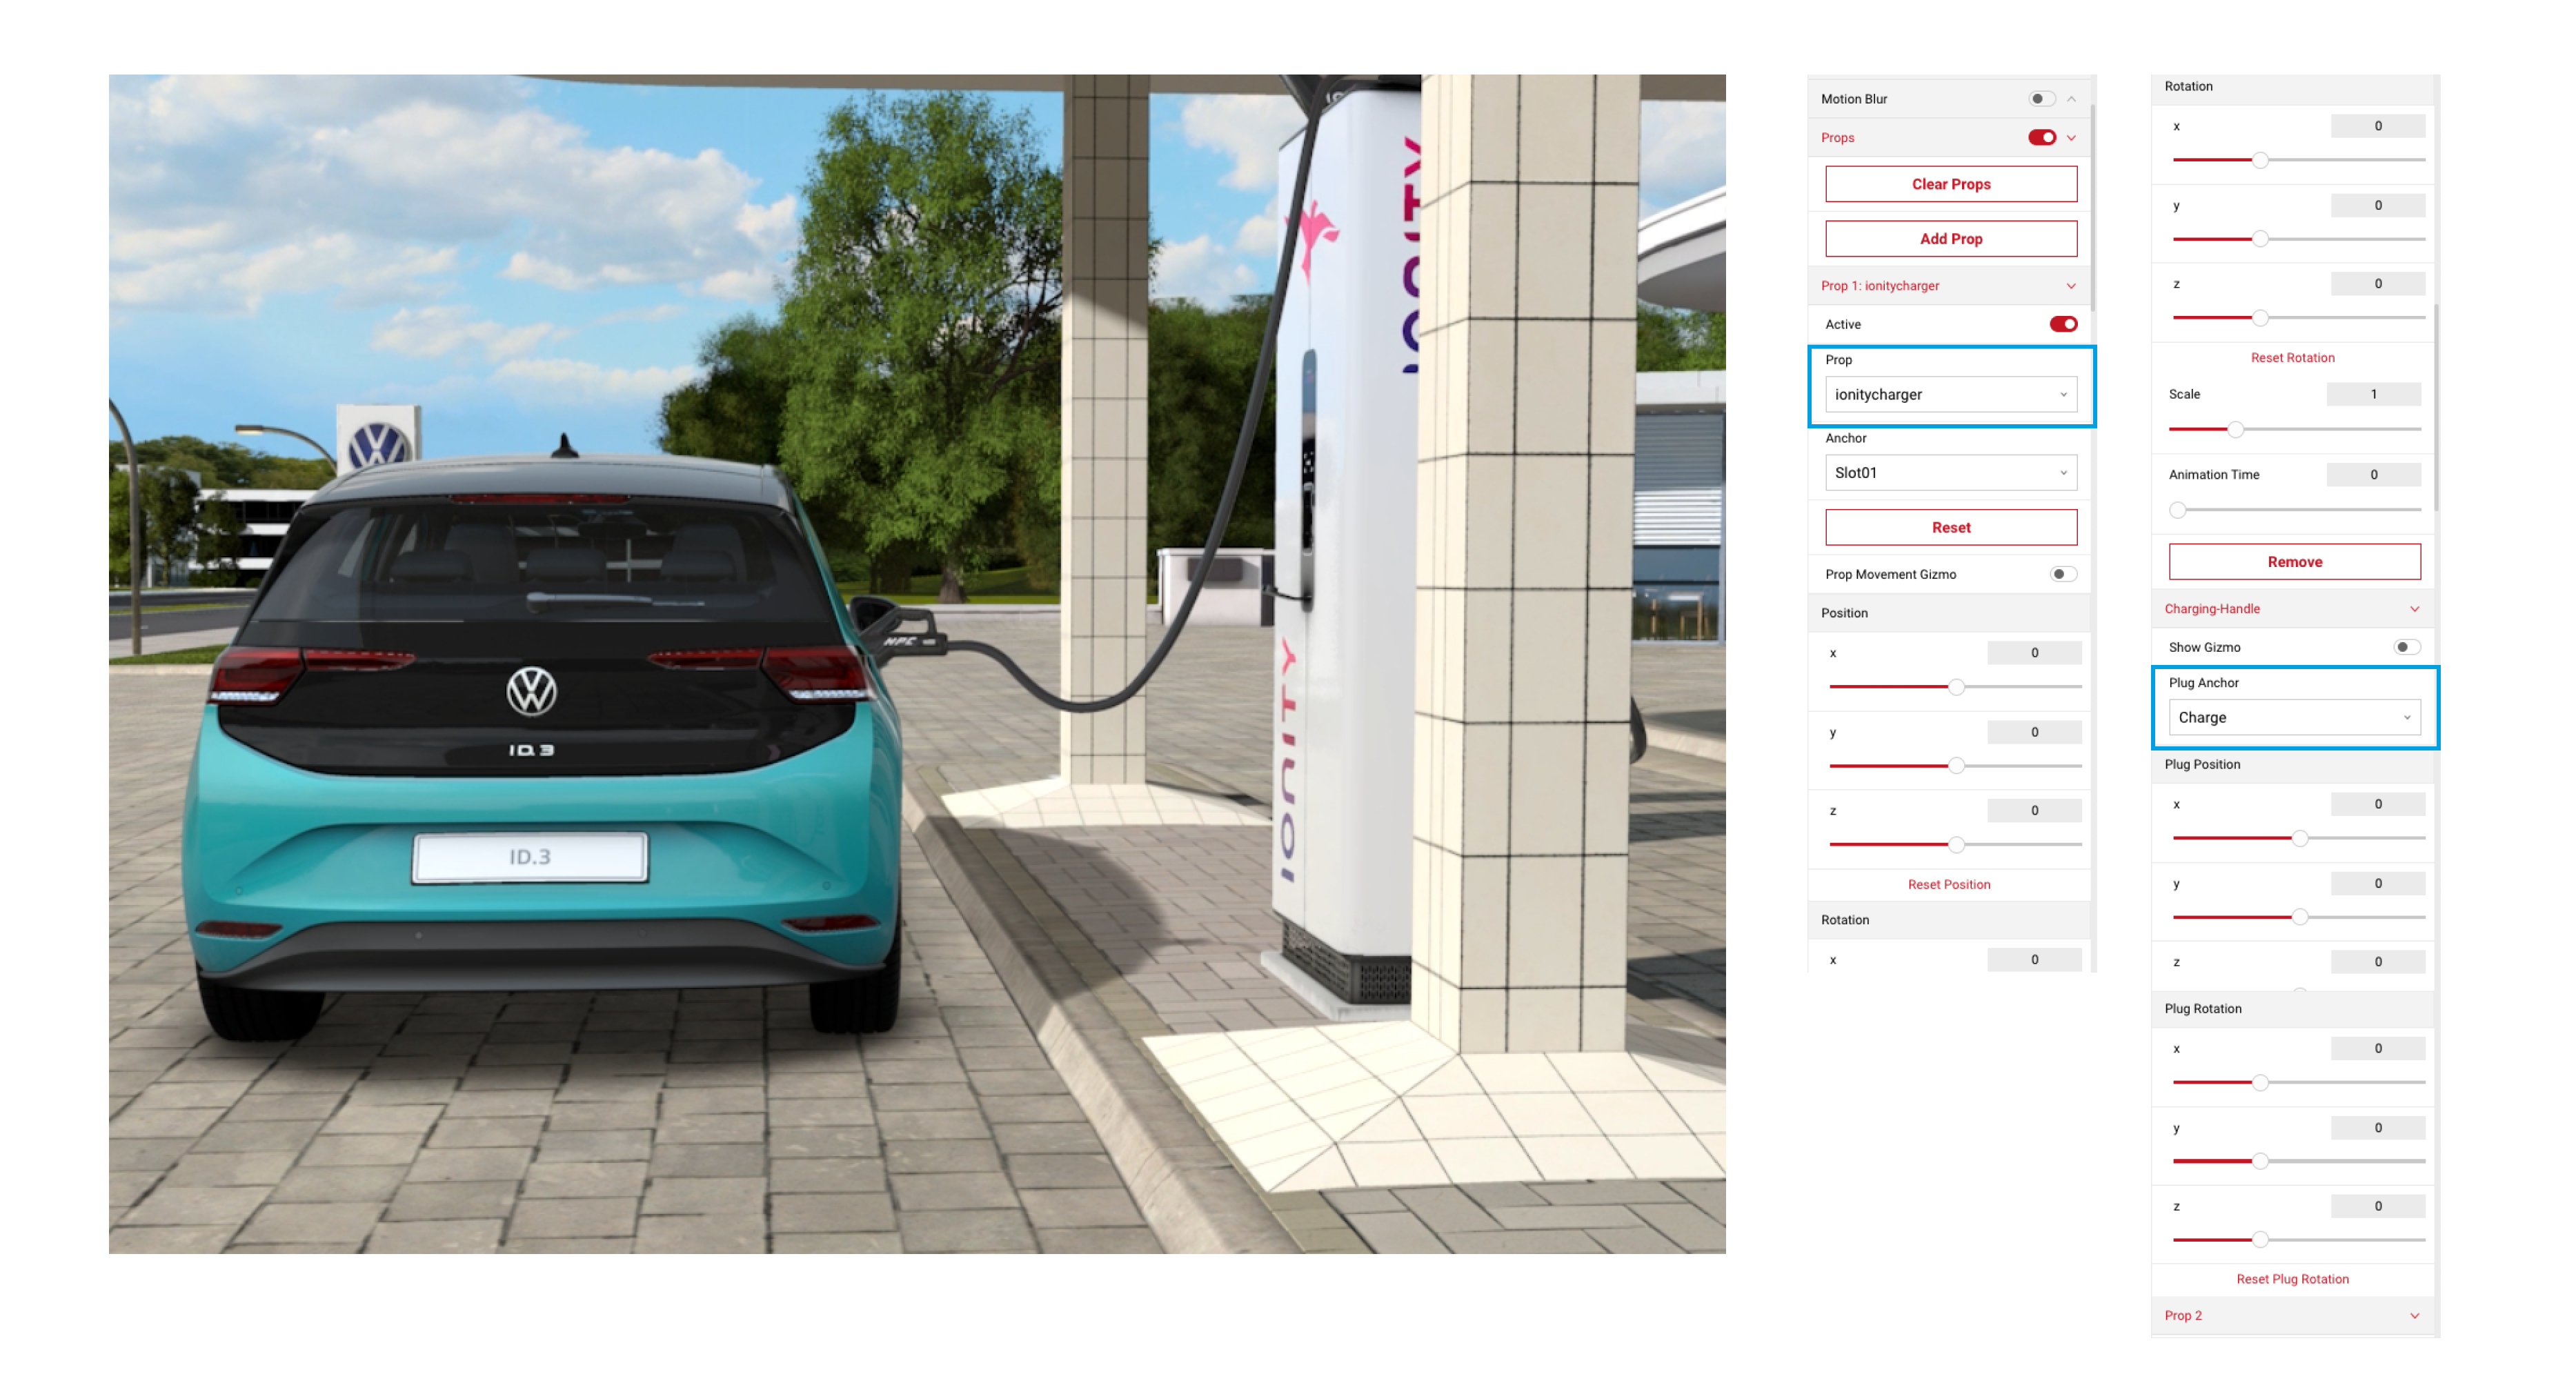
- After selecting the Plug Anchor, you can change the position and rotation of the handle independently from the ionitycharger prop.
- You can continue to add up to 4 props.
Prop Settings
- Active: Toggles the prop on and off in the scene.
- Prop: Dropdown with all of the available props the user can select. These are part of the composition so should be consistent regardless of the current car or environment.
- Use Anchor: Certain environments and cars contain prop anchor points. Enabling this will set the prop's position, rotation and scale to be relative to the currently selected anchor.
- Anchor: Selects which anchor a prop should be set to. These are tied to the current car and environment, so switching either will cause the list to update.
- Reset: Resets the position, rotation, scale, and animation time of this prop to their default values.
- Show Prop Movement Gizmo: Displays a move/rotate gizmo for the prop, allowing the user to more easily set the position and rotation of the prop (The prop needs to be active for this to be used).
- Movement Gizmo Mode: Selects the movement mode of the gizmo between Move and Rotate (only appears when Show Prop Movement Gizmo" is turned on).
- Position: Sets the position of the prop, relative to the world origin or an anchor's origin if attached to a prop anchor. Each axis extends between -10 and 10, defaulting to 0.
- Rotation: Sets the rotation of the prop, relative to world space or an anchor's rotation if attached to a prop anchor. Each axis extends between -180 to 180, defaulting to 0.
- Scale: Sets the scale of the prop, relative to world space or an anchor's scale if attached to a prop anchor. This extends between 0.01 and 4, defaulting to 1.
- Animation Time: If a prop is animated, then this sets the current frame of the animation. Value is the number of seconds from the beginning of the animation. The maximum value (the length of the animation) will update when the animated prop is first enabled. Defaults to 0.
- Remove: Removes this prop from the scene and UI.
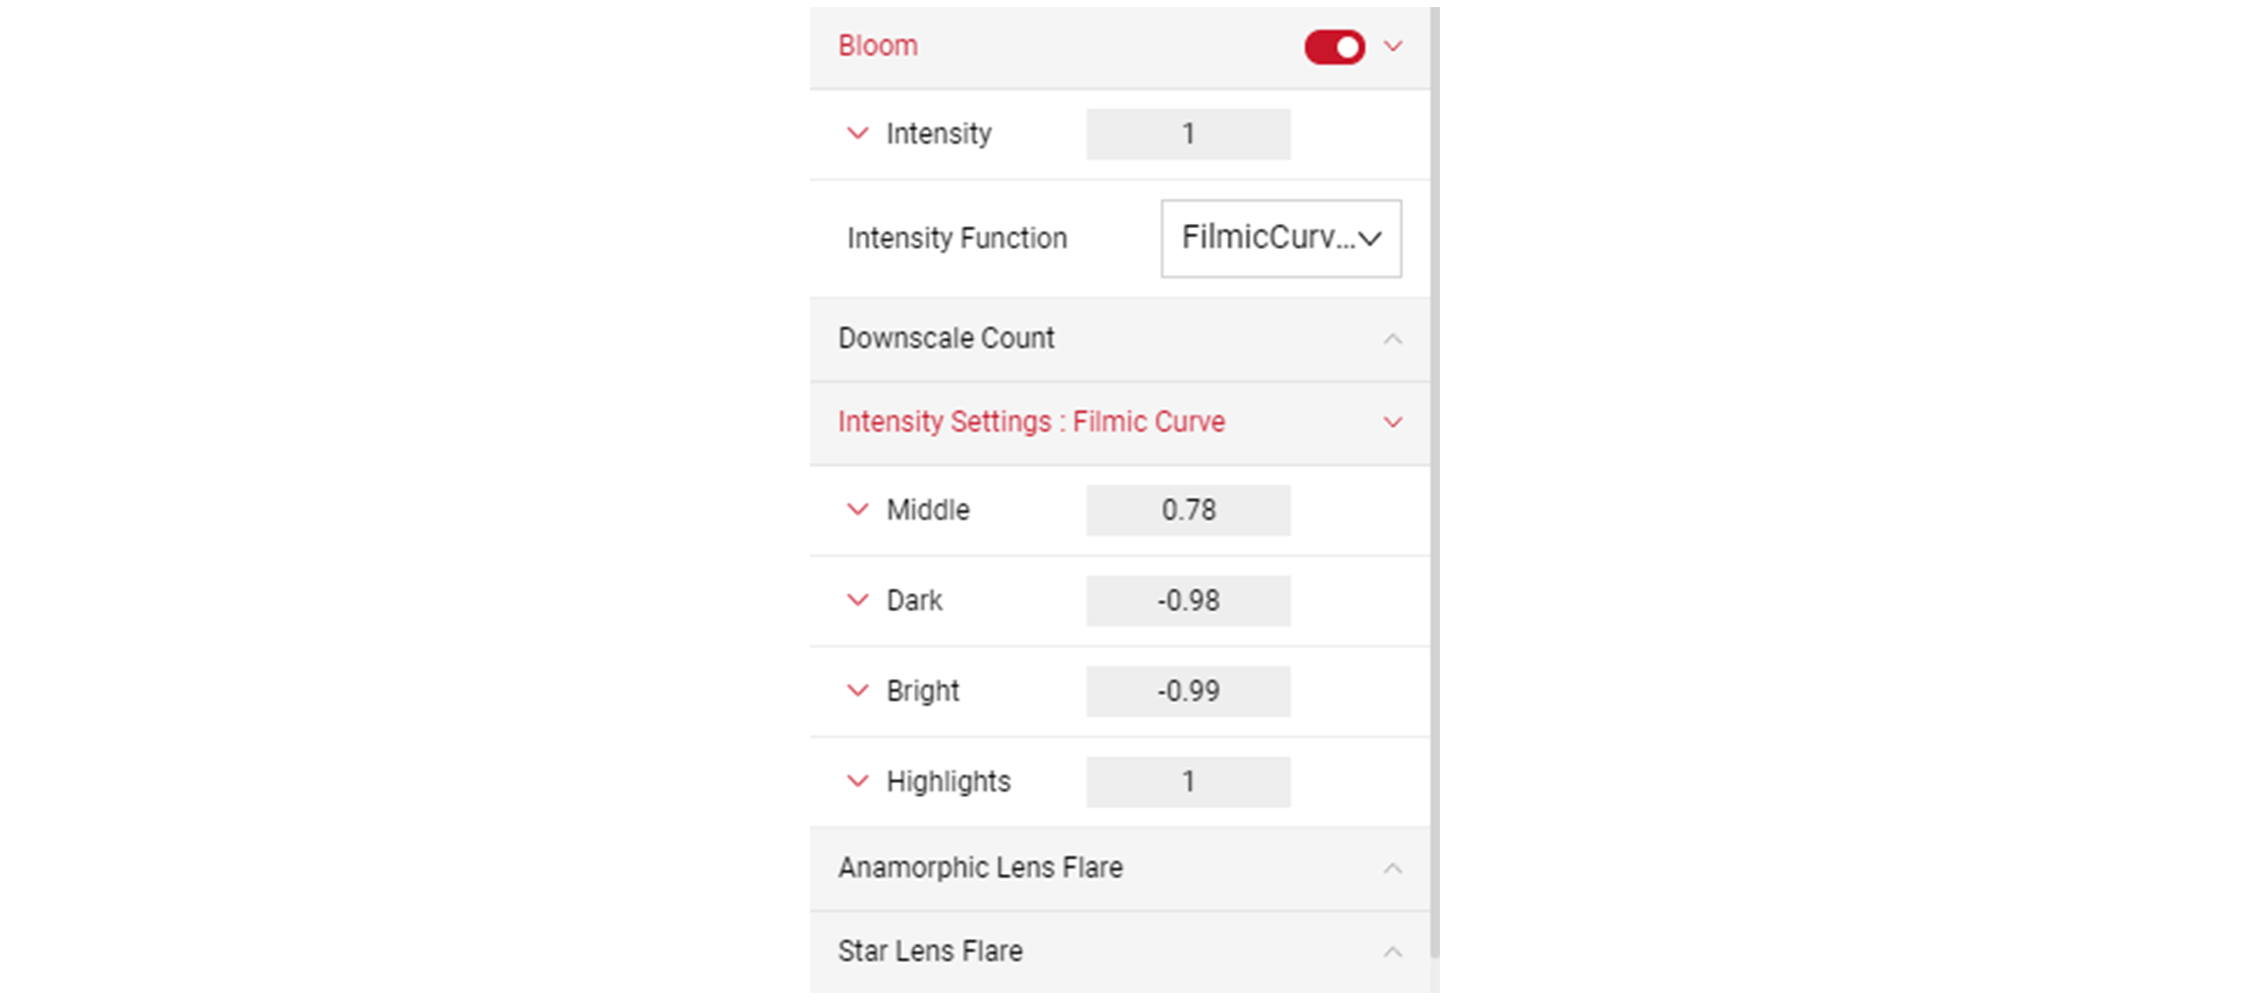
Bloom
The Bloom effect simulates a camera viewing a bright light, which exaggerates any existing lights in the image. By increasing the effect’s intensity, any parts of the image with lighter colors will glow. You also have additonal settings to adjust the Anamorphic Lens Flare and Star Lens Flare. Click on the slider button on the right to enable the Bloom option. The slider button turns red once activated.
- The Intensity slider adjusts the glow of the lighter colours in the image.
- Intensity Function allows you to select a Threshold or Filmic Curve intensity.

- Threshold Intensity is a standard linear intensity limit and is more of a simplistic effect.
- Filmic Curve Intensity allows for mapping the intensity of the Bloom effect across a more complex curve. Filmic Curve allows you to adjust the intensity across Middle, Dark, Bright with another slider to adjust the Highlights.
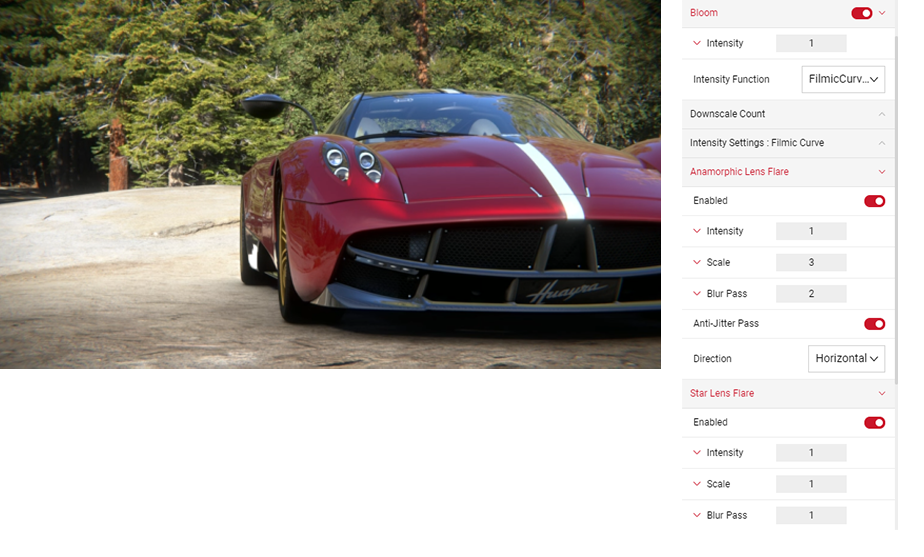
Anamorphic and Star Lens Flare
When enabled, the Anamorphic Lens Flare effect creates horizontal/vertical lens flare at the highlight points of the image. The Star Lense Flare effect has the same controls as the Anamorphic Lens Flare option, although this effect creates a star shape flare rather than horizontal/vertical lines.
- Click the Anamorphic Lens Flare.
- Click the Enabled slider.
- Adjust the Intensity slider to increase the glow of the flares.
- Adjust the Scale, and Blur Pass sliders to achieve the look you want.
- When enabled, the Anti-Jitter Pass slider reduces any noise created by the flare.
- You can also change the Direction of the flare to Vertical/Horizontal.
Lighting and Reflection
To be able to adjust the lighting and reflection on your image, enable the Lighting & Reflection Adjustment feature. Click on the slider button on the right to enable the Lighting & Reflection Adjustment option. The slider button turns red once activated.
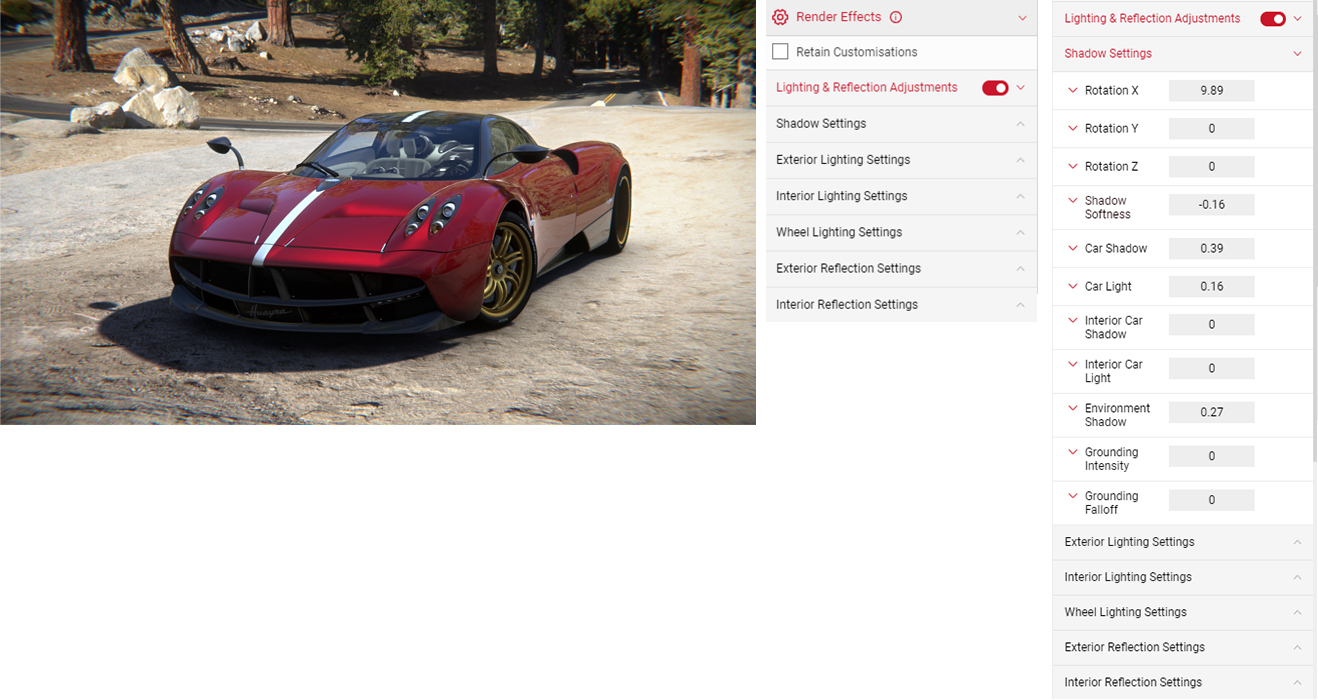
Shadow Settings
- Click on the Shadow Settings panel to reveal more options to adjust the shadow brightness and intensity as well as the direction of the shadow on the X, Y and Z axis. Try to match the direction of the shadows with the light source in the environment. Click on each setting panel to adjust the slider, or enter a value by clicking the number box.
- Shadow Softness adjusts sharpness of the shadow beneath the car. The lower the value, the higher the sharpness of the shadow.
- Car Shadow adjusts the intensity of the shadowed areas of the vehicle exterior. The higher the value, the brighter the shadowed areas will be.
- Car Light adjusts the intensity of the un-shadowed areas on the car. The higher the value, the brighter the un-shadowed areas will be.
- Environment Shadow adjusts the intensity of the shadow being cast by the car. The higher the value, the brighter the shadows will be.
- Grounding Intensity alters the spread and intensity of the darkness directly beneath the vehicle.
- Grounding Falloff slider allows you to make finer adjustments of the spread and intensity of the shadow underneath the car.
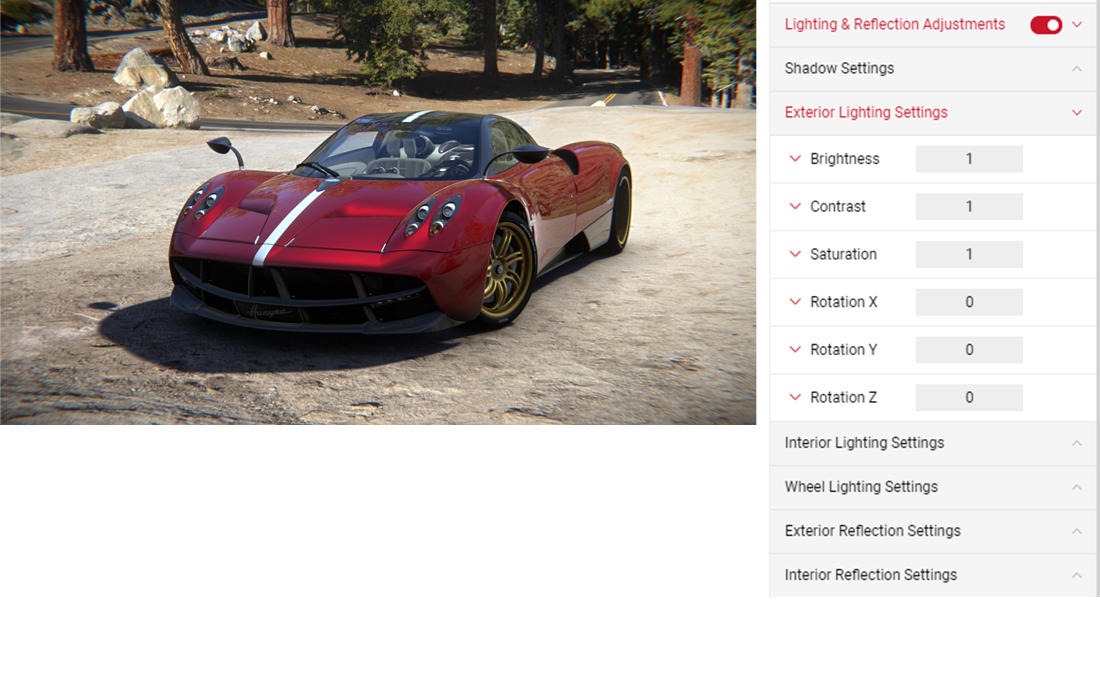
Lighting and Reflection Settings
- Click on the Exterior Lighting Settings panel to adjust the brightness, contrast, saturation and direction of the lighting on the exterior of the car.
- You also have the same options available to adjust the Interior Lighting and Wheel Lighting settings separately.
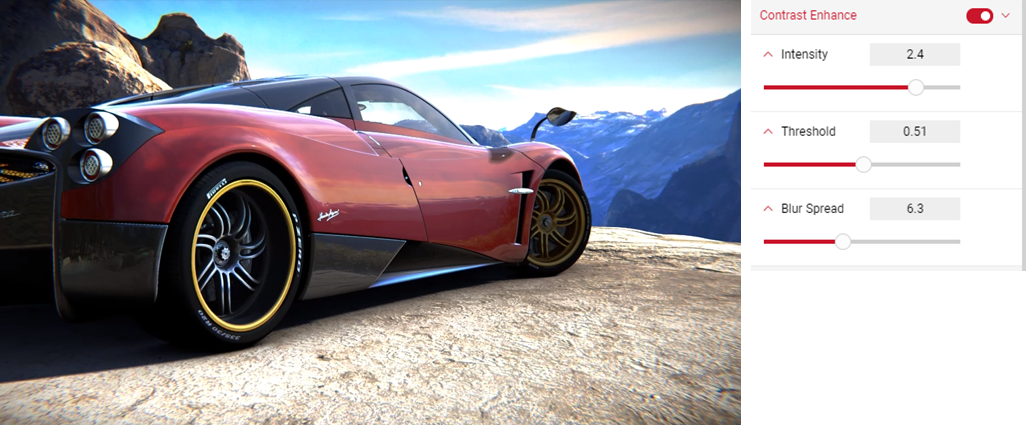
Contrast Enhance
Enable the Contrast Enhance feature to adjust the Intensity, Threshold, and Blur Spread. Click on the slider button on the right to enable Contrast Enhance option. The slider button turns red once enabled.
- Click on each setting panel to reveal each slider. You can also enter an exact value in the number box.
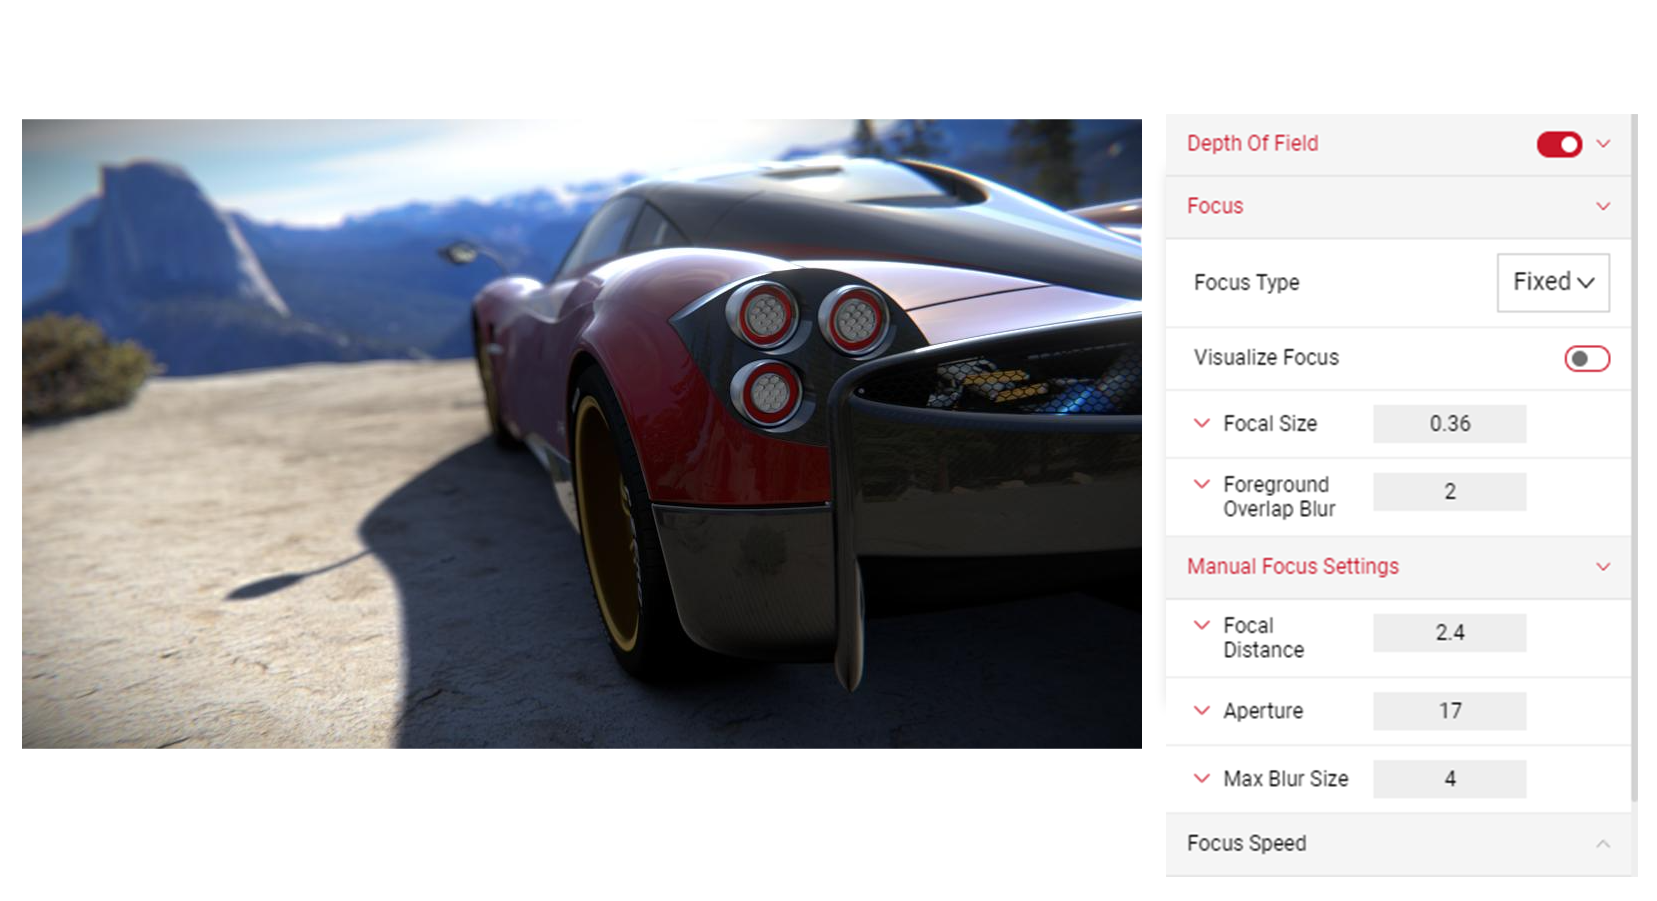
Depth of Field
The Depth of Field gives you the option to change the focus and focal settings of your image. Click on the slider button on the right to enable the Depth of Field option. The button turns red once activated.
- Enable the Depth Of Field effect and select a Focus Type:
- Transform allows the user to set up depth of field to determine the distance from a specific object's transform in the scene, although the default object can't be changed.
- AutoFocus focuses on whatever is central to the image, particularly useful for Quick Shots.
- Fixed enables the Manual Focus Settings. The user can set up the specific Focal Distance, Aperture sizes & Max Blur size which will not change respective of geometry distances and remains the values you set it to.
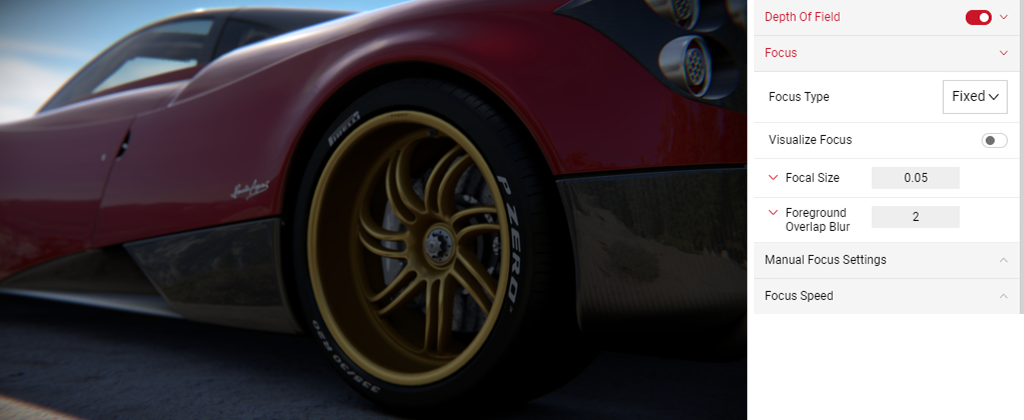
- Focal Size adjusts the focal length of the camera.
- Foreground Overlap Blur adjusts the blur of the foreground.
Manual Focus Settings
- Focal Distance adjusts the distance of the lens to the focus point.
- Aperture adjusts the aperture of the depth of field. Increasing the value will make parts of the image less "in focus".
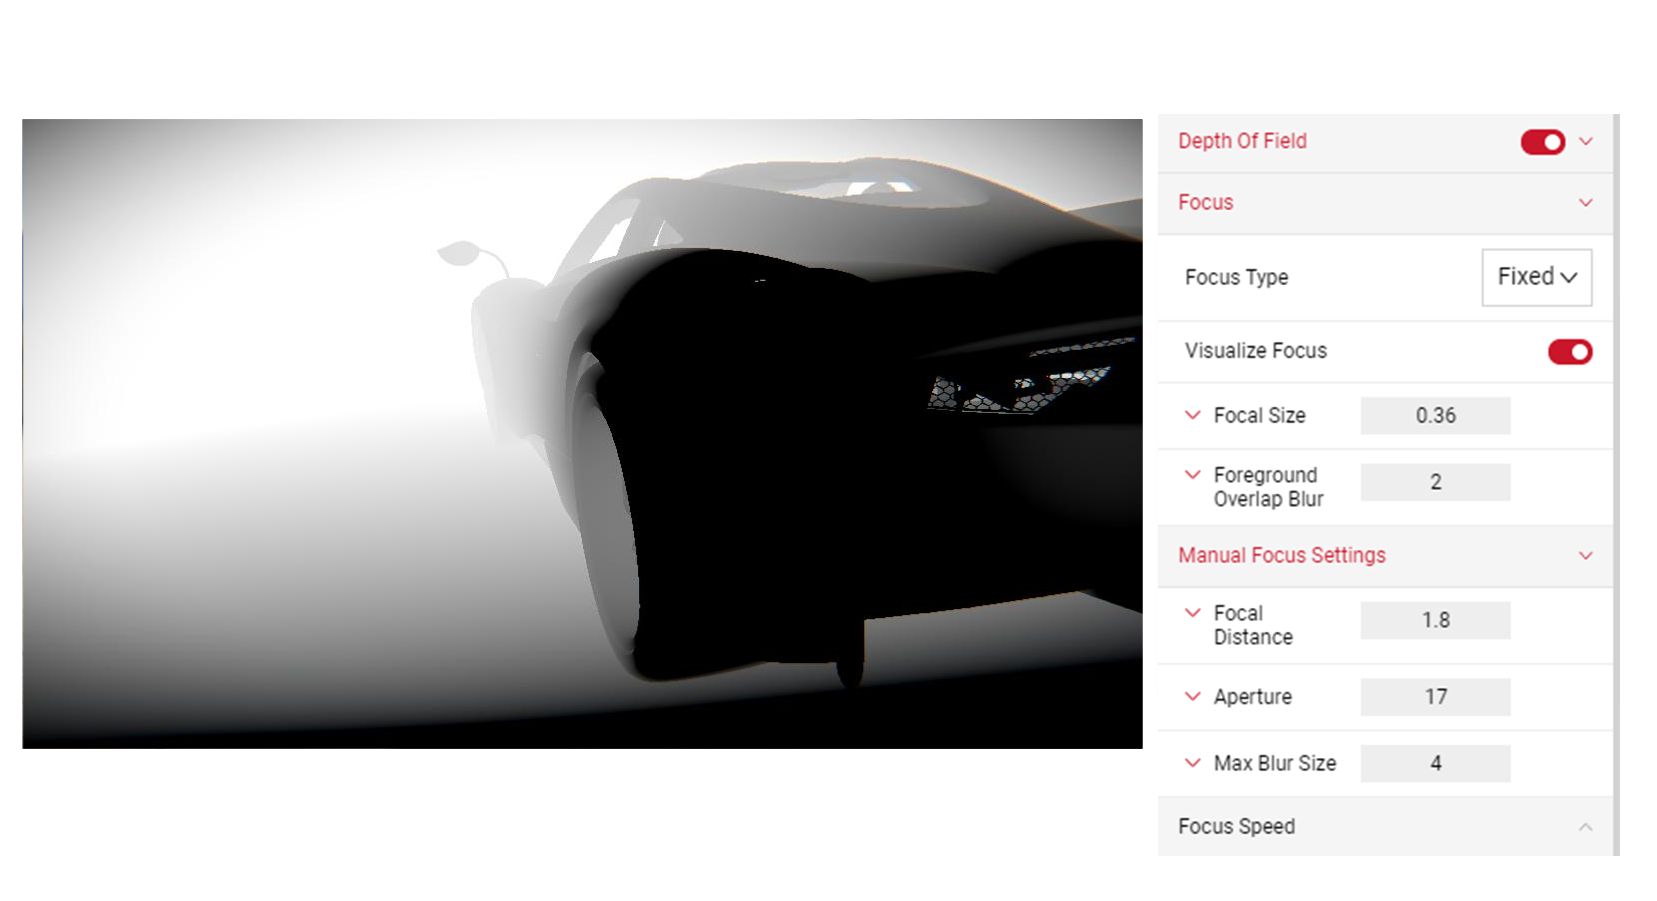
- You can enable the Visualise Focus slider to preview the setting before exporting. When this is enabled the black sections of the image show the sections that will be in focus when the image is exported, the white sections show the out of focus points of the image.
Motion Blur
Create a sense of speed by adding a blur that flows in one direction using the Motion Blur effect. Click on the slider button on the right to enable the Motion Blur option. The slider button turns red once enabled. You can adjust the Environment Speed, Wheel Speed and Blur Sky. This is a visual effect only and doesn't reflect a specific speed.
- Click on each setting panel to reveal the slider or enter an exact value in the number box.
- Environment Speed adjusts the blur of the current environment.
- Wheel Speed adjusts the blur on the wheels only.
- Blur Sky prevents clipping between the sky layer and environment layer elements.

Visit the Dynamic Picture Production Tutorial to learn more on using the Motion Blur and how to create dynamic images.
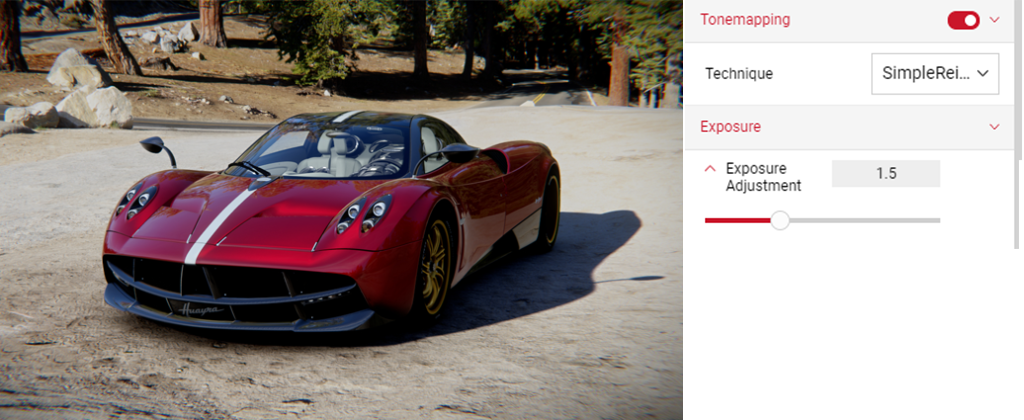
Tonemapping
Tonemapping is an image processing technique allowing a set of colours to map to another in order to create high dynamic range. Click on the slider button on the right to enable the Tonemapping option. The slider button turns red once activated.
You can choose from a range of Techniques:
- SimpleReinhard - Basic linear exposure driven with a single exposure adjustment value.
- Hable - Similar to SimpleReinhard but has a lower increase at the bottom of the tonemapping curve, meaning darker areas less boosted.
- Photographic - Similar to above, emulates real film.
- OptimizedHejiDawson - Produces a high-contrast tonemapping curve. Usually much more noticeable than the other techniques.
- AdaptiveReinhard - Performs similar basic exposure adjustment to the simpleReinhard, but allows user control to tweak the middle grey point of the tonemapping curve and the top white.

Click on the tab again to hide the Tonemapping effect. To disable the effect, click on the red slider button, which will switch to grey once deactivated.
Layered Post Effect
Layered Post Effects removes blurry effects on glass or windows. If selected, the default Depth Of Field type is Standard. There are 3 options that vary in quality.
- Standard is the normal depth of field technique.
- FULL_RES is similar to Standard but less performant with higher quality output as it does another pass.
- FULL_RES_TRANSPARENCY is the highest quality method, it includes 3 passes of depth of field. This setting is particularly useful when producing a shot of transparent materials e.g headlights or glass and produces a nicer looking output.

Lens Effect
Add Vignette to darken the corners of your image while maintaining a bright centre with the Lens Effect. This effect can be used to draw attention to the focal point of the image. Click on the slider button on the right to enable the Lens Effect option. The slider button turns red once enabled.
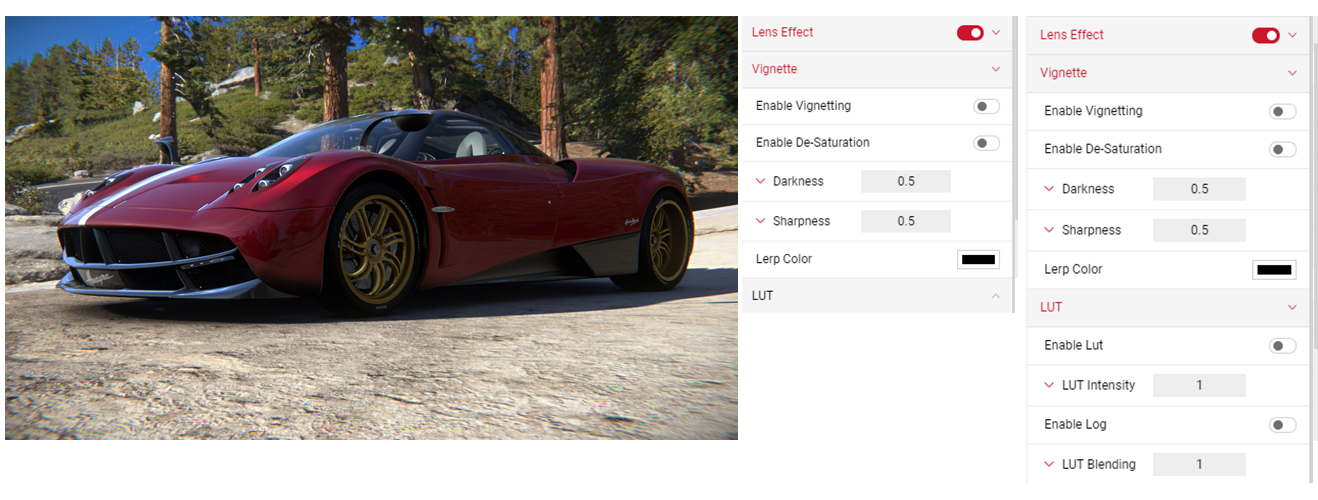
- Click on the Vignette tab to reveal more settings. Click on the Enable Vignetting slider to add the effect.
- Enable De-Saturation of the effect by clicking on the slider.
- Darkness adjusts the darkness of the vignetting. The higher the value, the darker the corners of the image will be.
- Sharpness adjusts the sharpness of the effect. The higher the value, the sharper the vignetting will be.
- Lerp Colour determines the colour of the effect, and changes the colour of the corners of the image in the Viewport.
- Click on the tab again to hide the Lens effect. To disable the effect, click on the red slider button which will switch to grey once deactivated.
Car Light Adjustments
Note: This effect depends on the viewer your render service is using so may not be visible. A lighting animation also needs to be enabled before editing any of the Car Light Adjustment values.
When the Render Effects menu is enabled and disabled, Car Lighting Adjustments can also be enabled and disabled. If you disable and enable the render effects the lighting adjustment settings will be saved, and will not reset unless you change car.
A number of settings such as Car Light Type, Colour Type and Bulb Type are associated with a type (found in the Car Light Intensities sub menu). When editing these settings, changes only apply to the currently selected type. Changing type will hide the settings for the previous type and show the settings for the new type. The user will only be able to select a type if there are lights of that type in Animations on the active car.
- Projector Intensity: Increases the brightness of the light projectors on the ground. May reach a point where it reaches a max intensity. This can be edited by Max Projector Intensity to allow increased intensity.
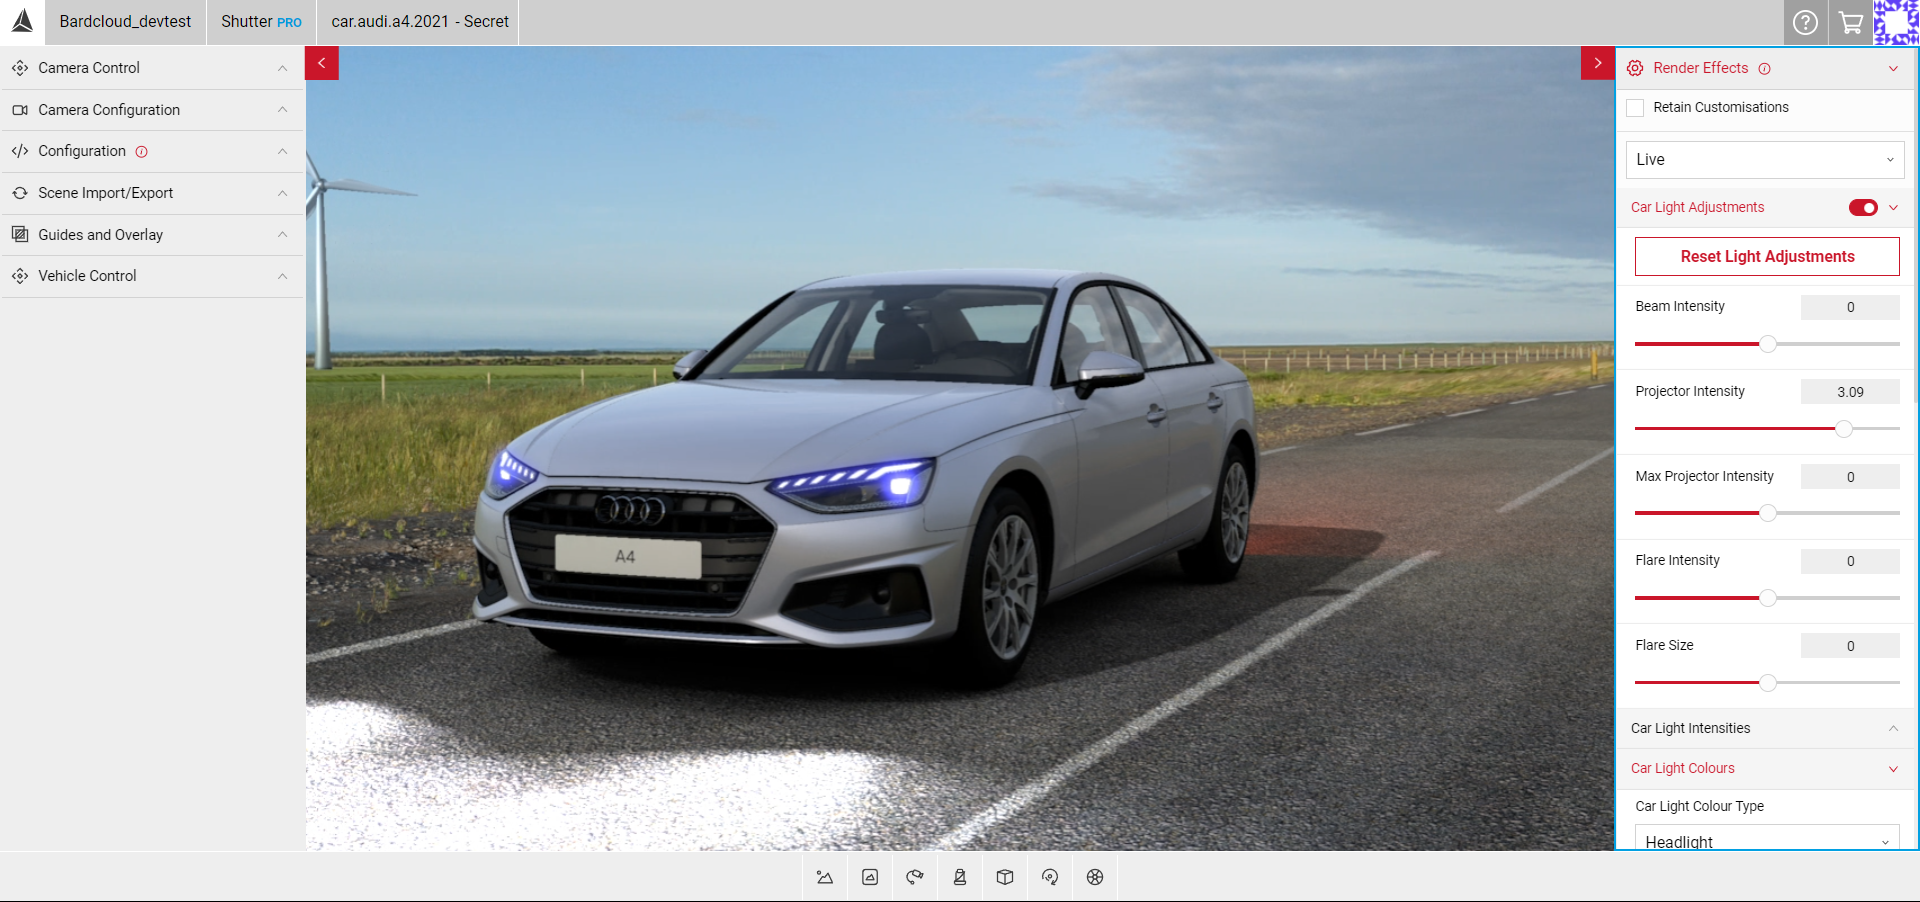
- Max Projector Intensity: Increases the point at which the Projector Intensity is clamped. Will only make a different if Projector Intensity is very high or the Max Projector Intensity is very low.
- Flare Intensity: Increases brightness of the flare from the bulbs noticeable in the headlights.

- Flare Size: Increases size of flare from the bulbs.

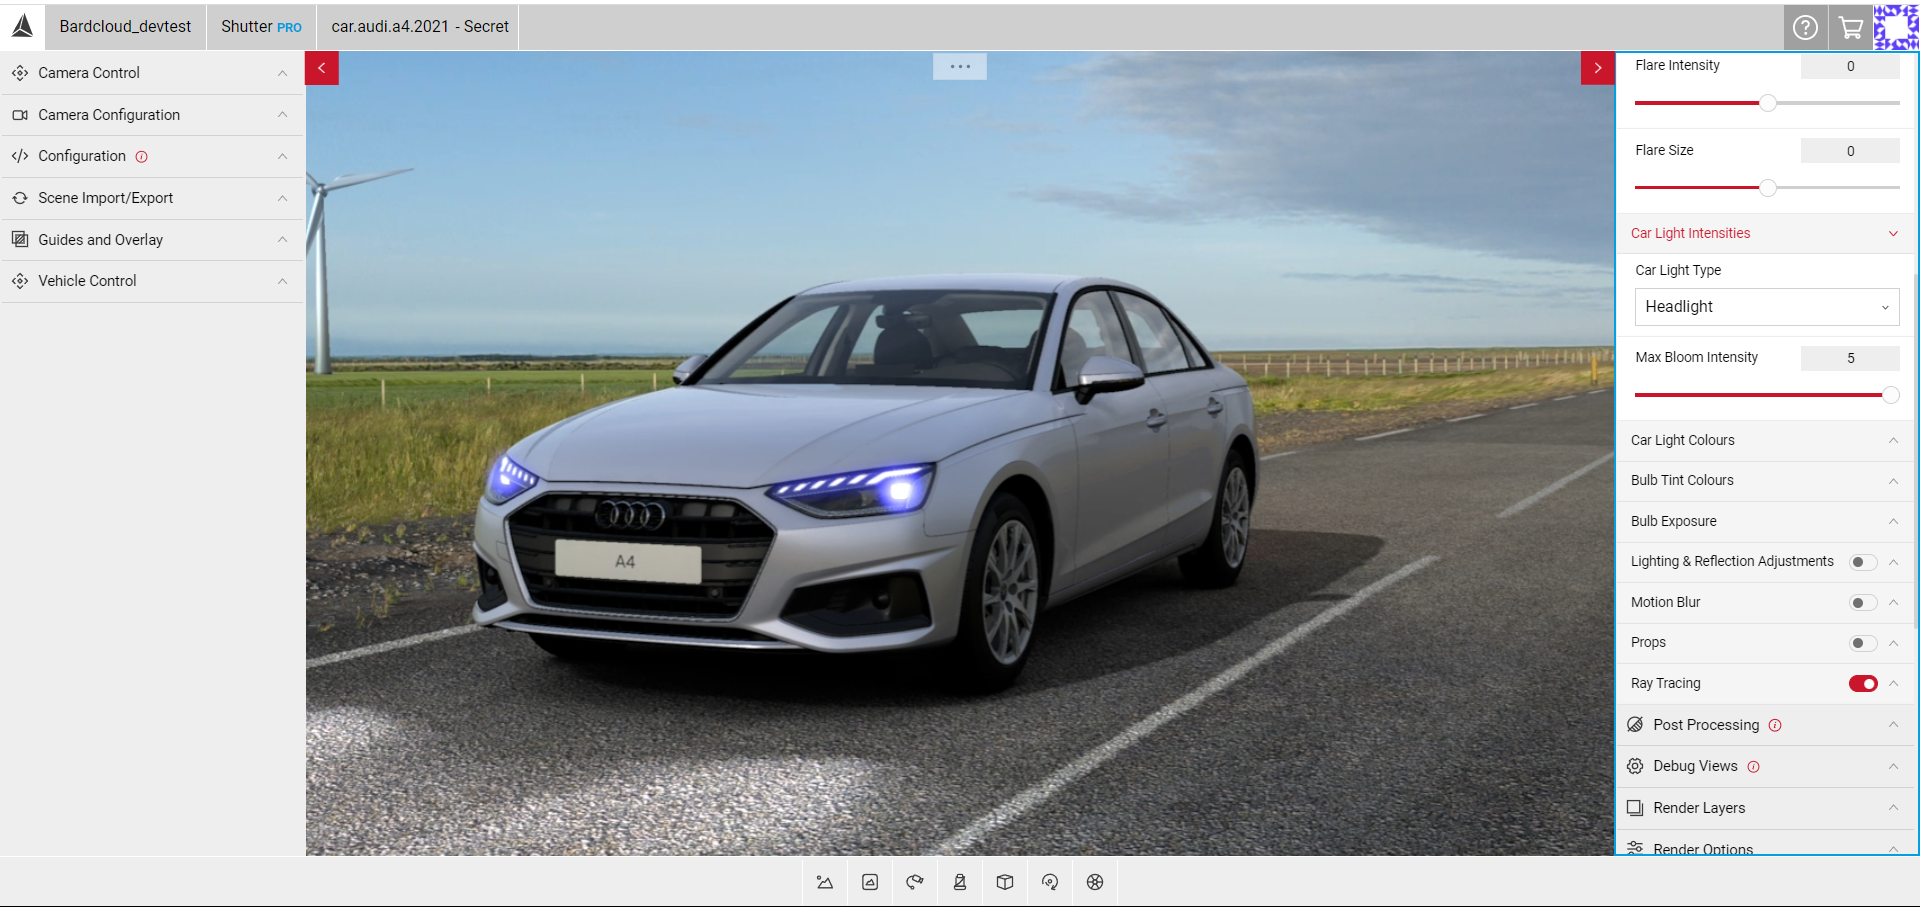
Car Light Intensities
- Car Light Type: Selects which light you want to adjust the intensity settings of. Options include:
- Headlight, Highbeam, DRL, Indicator, Breaklight, Tail Light, Front Foglight, Rear Foglight, Reverse Light, Numberplate Light, Position Light
- Max Bloom Intensity: Increases the visible bloom on the bulbs of the selected light type.
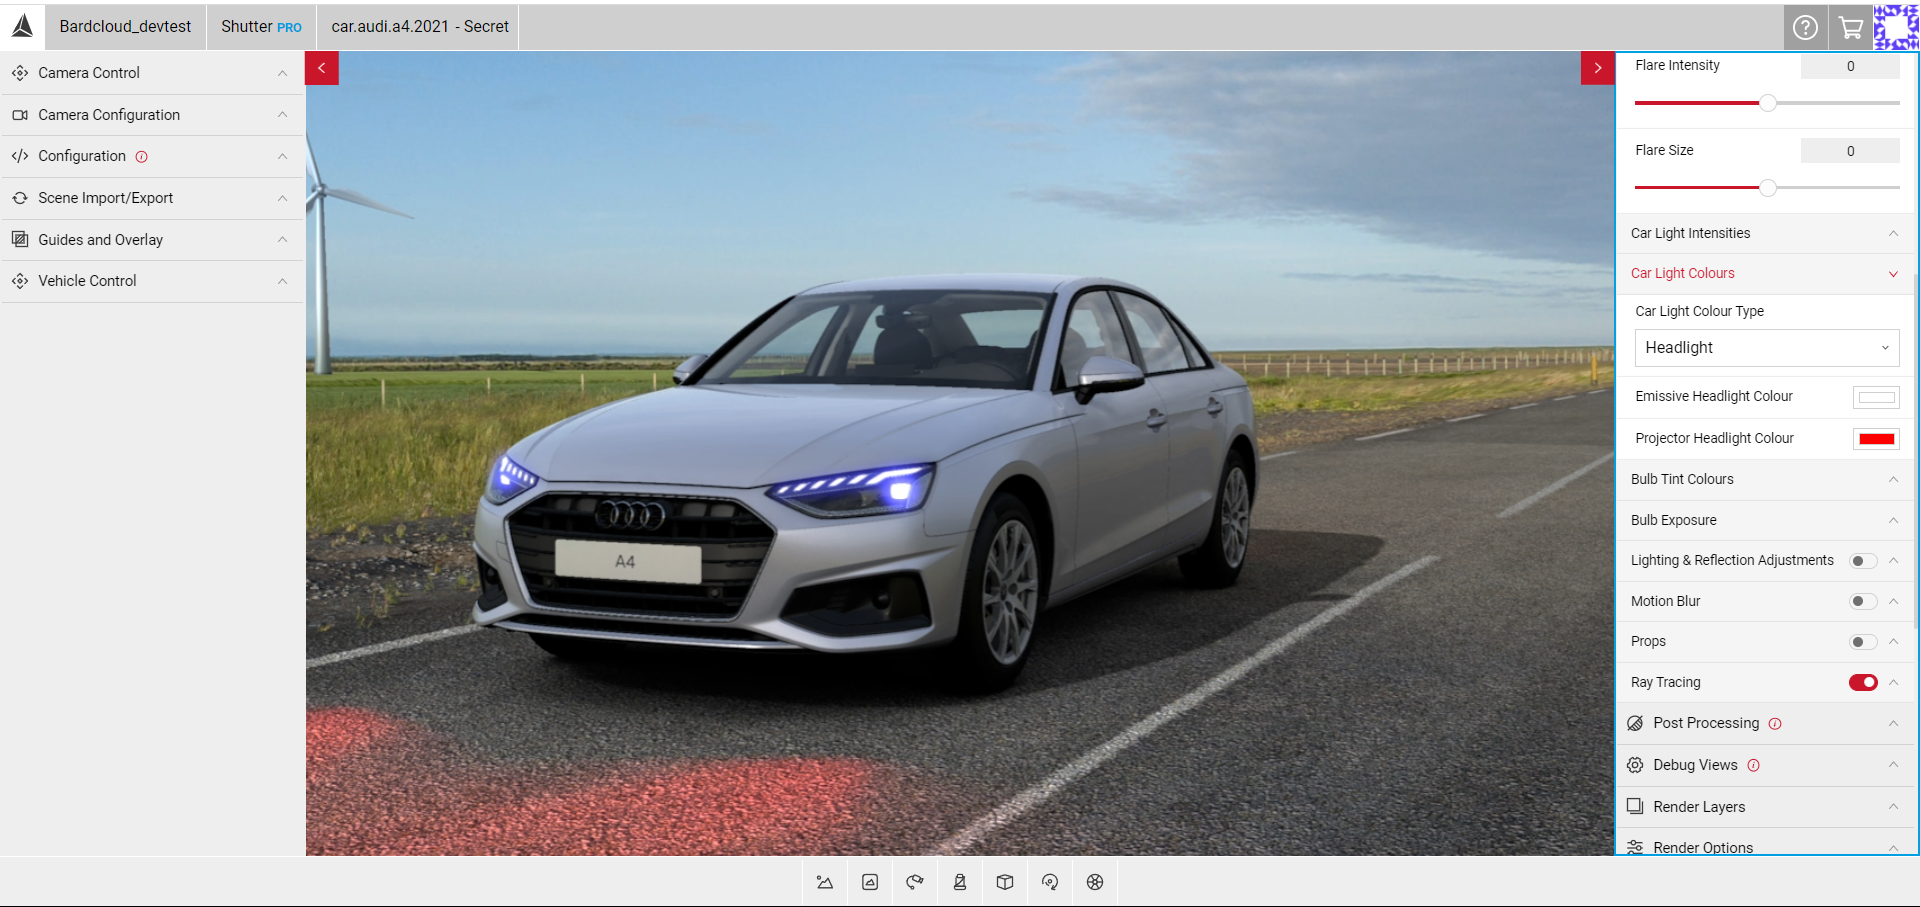
Car Light Colours
- Car Light Colour Type: Selects the colour type to adjust the car light colours of. Options include:
- Headlight, Indicator, Breaklight, Tail Light, Reverse Light
- Emissive Colour: Sets base colour of the lightbulb with the selected colour type.
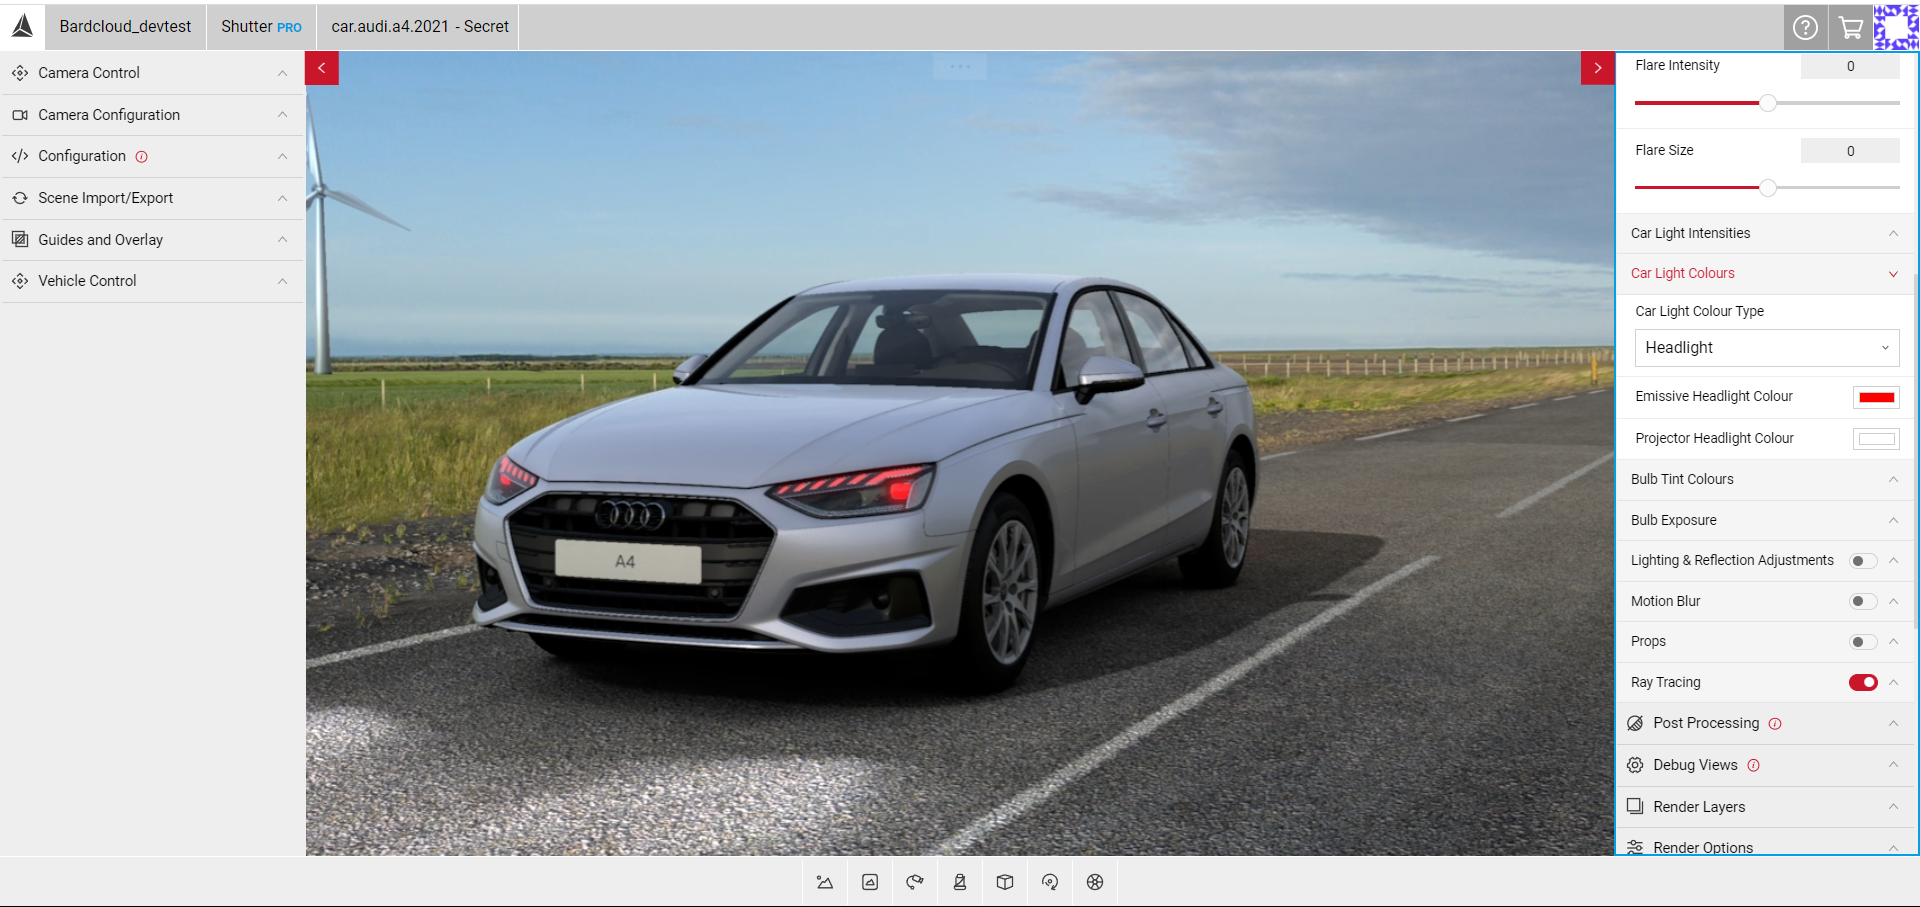
- Projector Colour: Sets the colour of the projectors on the ground with the selected colour type. This is combined with the bulb projector tint.
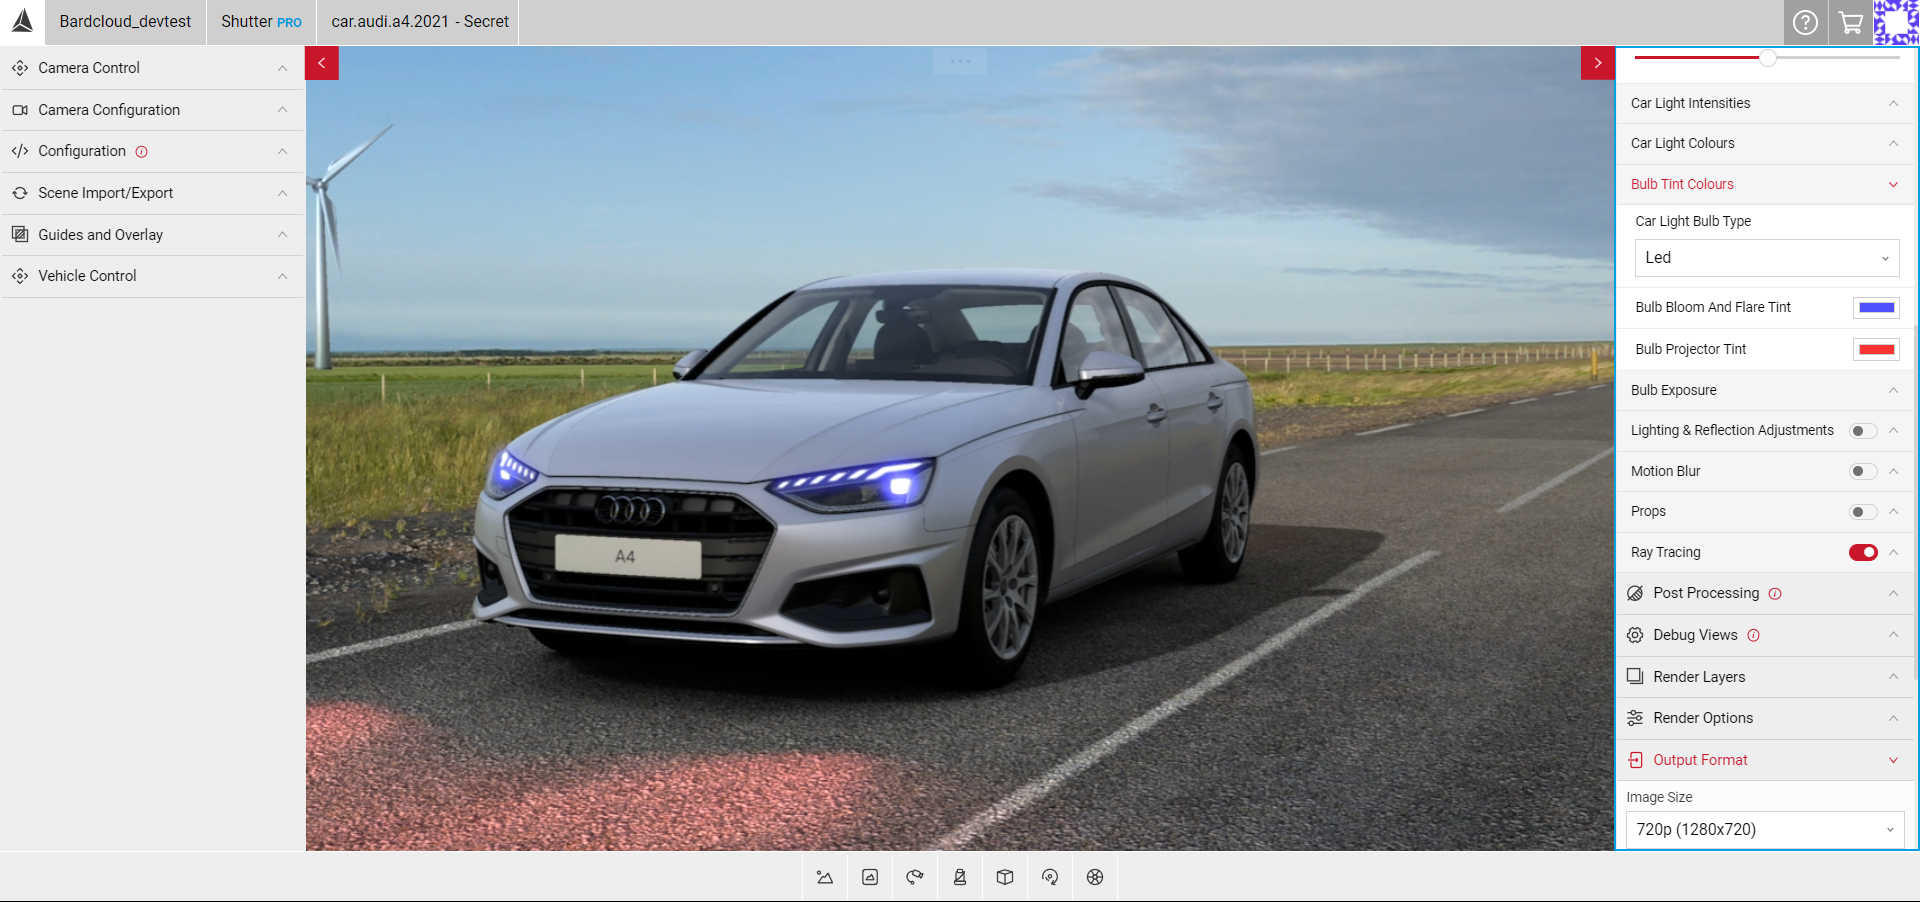
Bulb Tint Colours
- Car Light Bulb Type: Selects the bulb type to adjust the bulb tint colours of. Options include:
- Halogen, Laser, LED, Xenon, OLED
- Bulb Bloom and Flare Tint: Sets the tint colour of the bloom, flares, and beam (not the base bulb colour) of lights with the selected bulb type.
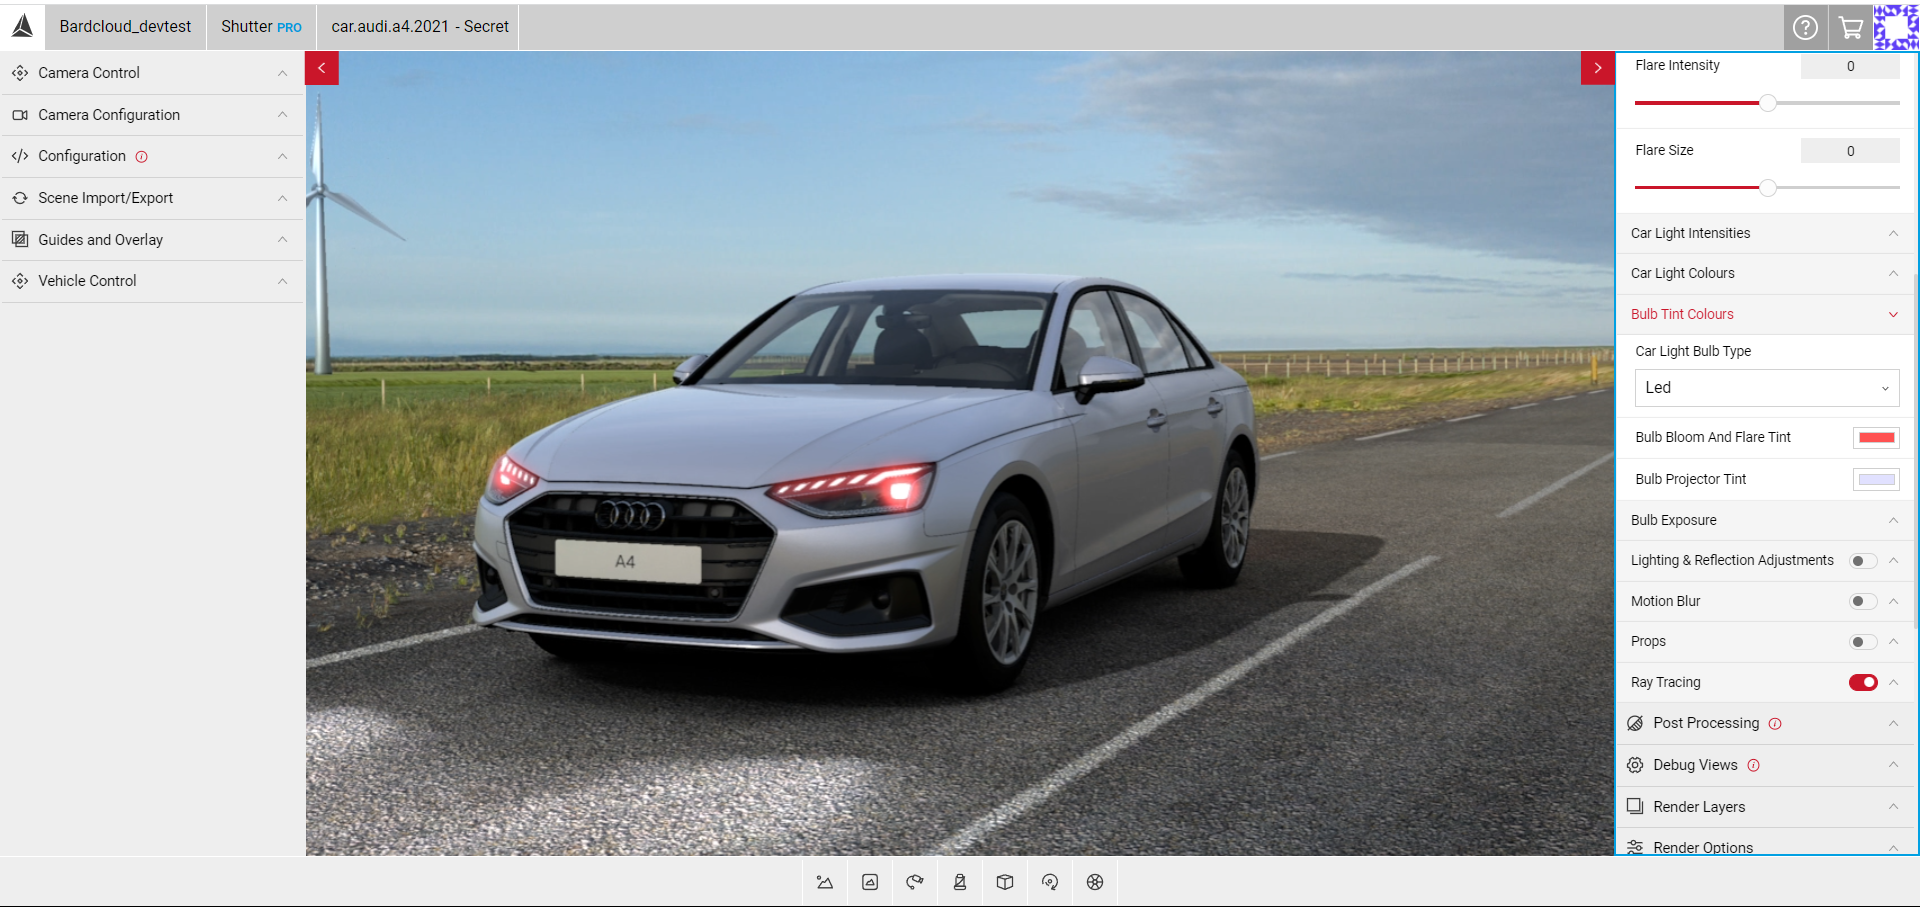
- Bulb Projector Tint: Sets the tint colour of projectors on the ground with the selected bulb type. These are combined with the projector colour.
Bulb Exposure
- Exposure Intensity: Adjusts the exposure/brightness of DG Light Bulbs (Not all cars have lights of this type).
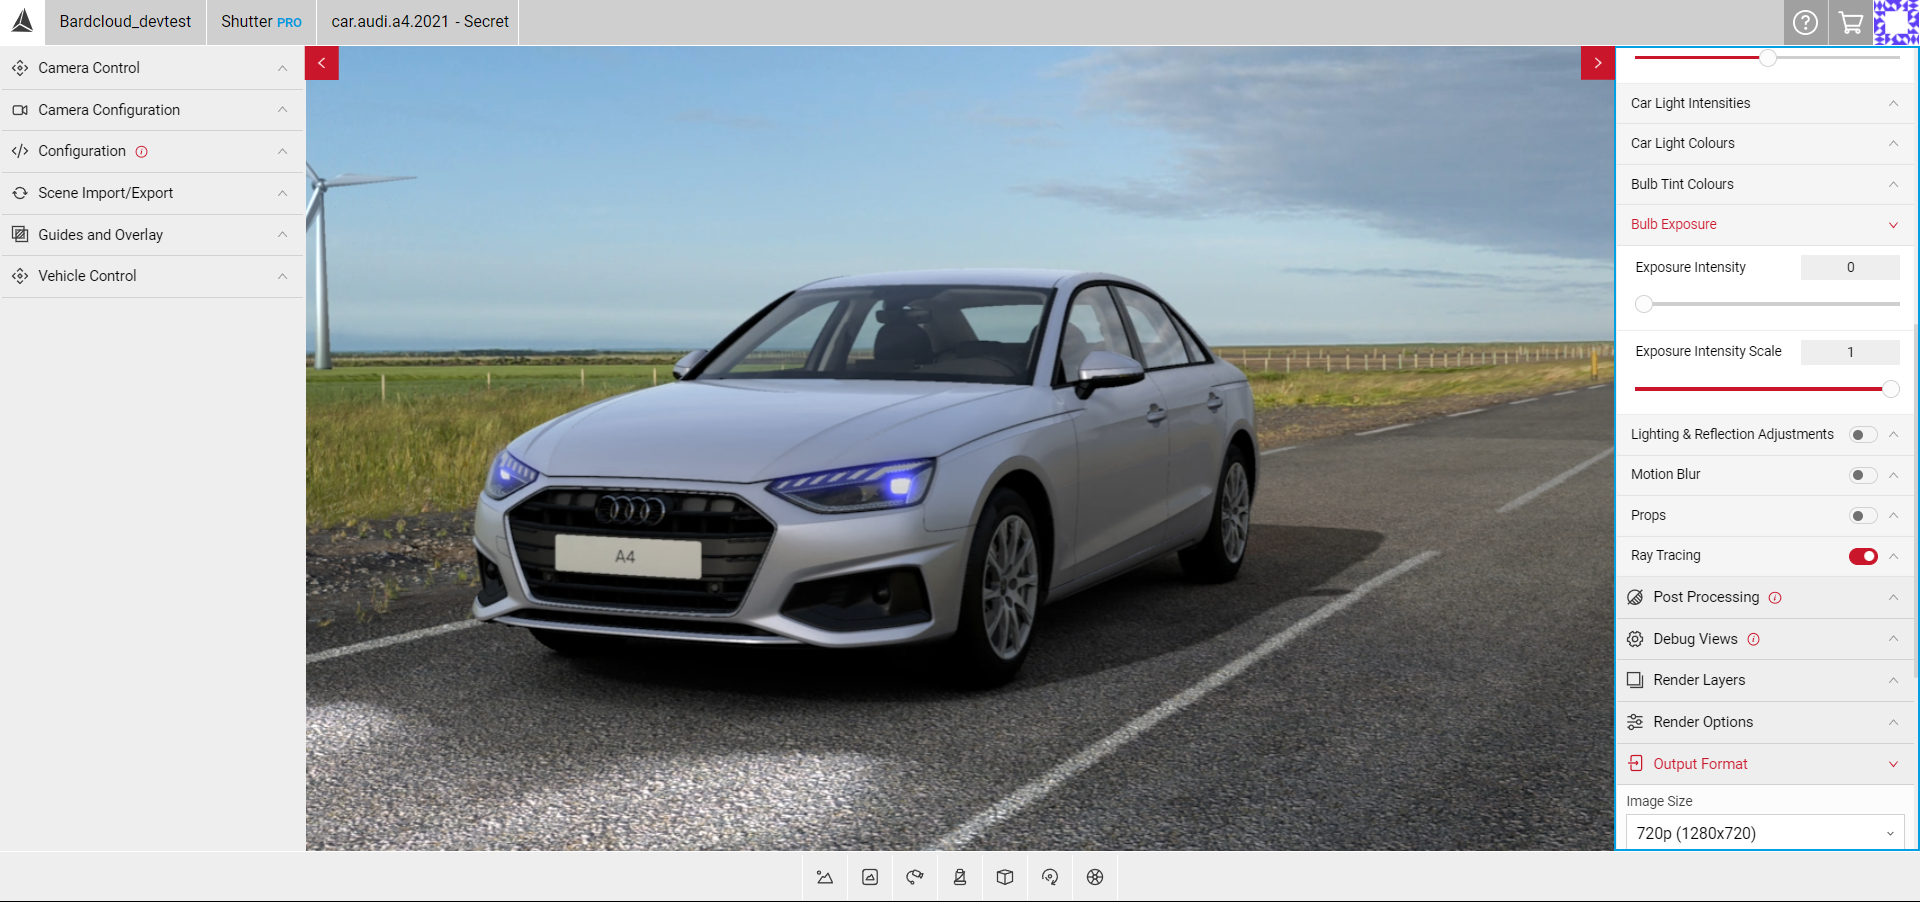
- Exposure Intensity Scale: Adjusts the sensitivity of the Exposure Intensity Slider. Lowering the Exposure Scale will make the Exposure Intensity do less at higher values.
Driver
Enable the Driver effect to simulate a person driving the vehicle. The slider button turns red once the effect has been enabled.
- You can enable the Left-Hand or Right-Hand Driver sliders to change the driver position from left to right.
- Adjust the Intensity slider to increase the intensity.
- Move the Scale slider to increase or decrease the size of the driver.

- Adjust the Rotation sliders to adjust the rotation of the driver on the X, Y and Z axis.
- Adjust the Position sliders to adjust the position of the driver on the X, Y and Z axis.
- Adjust the Body Parts sliders to change the position of the Head, Arms and Back. Increasing the value will tilt each part backwards.